How to change a radiator valve
Home Heating Maintenance 101
We know how intimidating the prospect of maintaining your home’s appliances can be. Between nightmarish visions of water leaks and burst pipes, it’s enough to put anyone off and leave it to the professionals. But the truth is that you can actually do a lot of it yourself - you just need the right knowledge and tools. Which is where we come in.
We don’t just want our customers to bag themselves a sweet deal on their new rads, but to be able to take care of them too. And whilst our top of the range models will stand the test of time, they’ll need a little TLC at some point too. But we don’t think maintaining your radiators should be a drain on your time or wallet. So we’re sharing our team’s 25+ years of home heating knowledge and secrets with you too. Whether it’s bleeding a radiator or understanding BTUs, we’ve got you covered.
Why replace a radiator valve?
Before we get going on how exactly you can change your radiator valves, let’s understand why you might choose to do so in the first place. There is a range of reasons as to why your radiator may need its valves replacing, from efficiency to looks.
If your current radiator valve is faulty
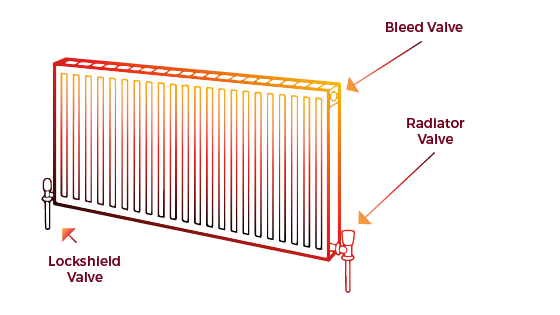
As with any home appliance, if it isn’t functioning properly then it probably needs to be replaced. Radiator valves are a crucial part of how a radiator operates because they are responsible for controlling the heat of your rad. A pair of valves each do their job by adjusting the amount of water entering and exiting the radiator on either side of the radiator. By doing so, they balance the heating system and allow you to change the temperature of your radiator with ease.
If one (or both) of your radiator valves is faulty, not only will it affect the performance of your radiator by not allowing it to heat up and cool down effectively, but it’ll also mean that you’ll end up spending more money on heating that you need. Particularly if your valves are stopping your radiators from heating up properly, you could waste a lot of money and energy on heat that you can’t even feel due to a faulty valve.
Swapping valve types
If you’re switching from manual valves to a thermostatic radiator valve, then you’ll need to change the current valves you have. The great thing about a thermostatic radiator valve is that once the set temperature is achieved, the valve will automatically stop the flow of water into the radiator, maintaining the temperature you want.
To update your radiator’s look
Classic, run of the mill radiator valves aren’t always the best looking option for your rad. Luckily for you, there is a whole range of stylish and smart radiator valves on the market to perfectly finish your heating system. From different colour options to specific styles and designs, you’re sure to find a radiator valve to suit your radiator’s look.
Things to consider before changing a radiator valve
There are a couple of things to keep in mind before changing your radiator valve.
- Firstly, you need to ensure that your new valve will fit onto your existing piping. If not, and your pipes need replacing too, it may be better to get a professional in to do the job.
- If you have a conventional system (with a small F&E tank in the loft), then again a professional will be better suited to replacing your valves.

What you’ll need
To successfully change your radiator valves, and to minimise mess, here’s a handy checklist of the things you’ll need before changing a radiator valve.
- New radiator valves
- Old towels or sheets
- An adjustable spanner or star key
- A wrench
- Plumber’s tape
- A hosepipe or large container
- A radiator bleed key
- A jubilee clip
How to change a radiator valve
Step 1: Prepare your workspace
Firstly, you want to prepare the space around you with your old towels, sheets and container to catch any spillages. Spoiler alert - the water that comes out of your radiator could be dirty!
Step 2: Turn off the heating and water
Turn off your water supply and heating system and wait for your radiators to fully cool. You also should check here that no heating programs are on and thermostats are off too, as they could affect the valve replacement process.
Step 3: Drain your heating system
This sounds daunting but is actually quite easily done. All you need to do is find your home’s drain cock, connect the hose to the drain cock and secure it with the jubilee clip. Then you need to run your hose outside, open the drain cock and let all the water clear out of your system.
Step 4: Remove your old valve
Use the wrench to hold the body of your old valve, and the spanner to unscrew the valve from the radiator. You may also need to remove the valve adapter if you need to replace that too.

Step 5: Place your new valve
After cleaning the valve and the pipe, carefully fit your new valve on by screwing it back onto the radiator. Remember to use some plumber’s tape on the water pipe to avoid any leakages after too. Try not to over-tighten the valve whilst still firmly attaching it to the pipe.
Step 6: Turn your water and heating back on and refill your system
This step is pretty self-explanatory, but one thing to remember is that when refilling your boiler system, you want the pressure gauge to come back to 1.5.
Step 7: Bleed your radiator
This is an essential step to make sure that all your hard work pays off by getting rid of any trapped gas inside the radiator. You can find a step-by-step guide for bleeding radiators here. For pressurised systems, you may need to refill your system again after bleeding your radiator.
Alternatives to changing a radiator valve
There are some products and services out there that will make the valve-changing process a little easier that you can opt for.
Get a freezing kit
This handy product works by temporarily freezing the flow pipe of your radiator so that water doesn’t flow out of the radiator onto the floor during the valve changing process. You can find them in most homeware or DIY stores, and they’re usually around £20.
Or a radiator draining kit
Another great kit to help the process of changing your radiator valve along a bit is a radiator draining kit. At around £10, it contains lots of useful tools and accessories such as water repellent gel and a diverting collar that you wouldn’t find lying around in the kitchen draw.
Get a professional in
There’s no shame in needing some help. If changing a radiator valve isn’t for you, or you don’t have the time or means to do it yourself, then you can always get a trusted, registered engineer in to do it for you. Whilst this is the most costly option, it also gives you the most peace of mind. You can trust that your radiator valves will be fitted properly and effectively, plus you can put your feet up and enjoy a cuppa in the meantime!
Hopefully, this handy guide will help you to change your radiator valves with ease. For more tips and tricks like this, head over to the blog now!