The Ultimate Guide to Thermostatic Radiator Valves (TRVs)
Different Types of radiator Valves
There are 4 main types of radiator valves that impact the functionality, we briefly need to look at the other 3 before going onto TRVs.
Manual Valves
As the name describes, you manually open and close these valves. They have their benefits which we will cover in the next section along with when to use TRVs.
Lockshield Valves
Probably one of the most important valves on a heating system, every radiator needs at least one of these on the return pipe. This valve is used to ‘balance’ the central heating system, ensuring that all radiators in the home get their fair share of hot water and heat up at the same time, without one radiator stealing it all from the others, leaving you with some roasting rooms and some freezing rooms. Lockshield valves are included in all purchases of TRVs from UK Radiators store.
Bleed Valves
Bleed valves are important to the maintenance of individual radiators, they are used to release trapped air from the top of radiators allowing the radiator to heat the room efficiently. Generally speaking, every radiator has and needs one of these, but they are also included with the radiator.
When to use a TRV
We mentioned manual valves above and you need to know when to use these in order to understand when to use a TRV Manual valves are used on bathroom radiators and towel rails, they are also used in what is known as the ‘reference rooms’. Reference rooms are locations in the property that have a boiler thermostat, this is a little box, usually mounted on the wall or free standing on a mantle piece, that detects the room temperature you have set (usually between 18-21 degrees) within the reference room and tells the boiler to shut off. You need to have one in this room for two reasons
- Most boiler warranty requires a radiator that is always open in the home so that the boiler always has somewhere to pump water to.
- The TRV and the boiler thermostat in the same room will cause a clash, if the TRV closes before the main boiler thermostat has reached its desired temperature, the boiler may never turn off.
Any other room should have a TRV installed, as this will then allow you to reduce the cost of your heating bill and impact on the environment as well as providing you the comfort levels that you want in each individual room.
How do TRVs work?
Thermostatic radiator valves have clever little mechanisms, sometimes using liquid or wax, that will shut off the flow of hot water to a specific individual radiator when the room temperature is at its desired level. Installing thermostatic radiator valves is like having a boiler thermostat control in every room, and while they don’t interact with the boiler directly, they heat up your radiators quicker by shutting off the water supply to their radiator earlier. This means your boiler has to heat less hot water to do its job, subsequently turning off quicker. In order to do this properly, they need to be installed on the flow side of the radiator, this is the pipe that feeds the hot water from the boiler to the radiator (we cover how to identify this later), with the lockshield valve on the return pipe. You may have heard of bi-directional TRVs, which means that functionally as far as the TRV is concerned, it doesn’t matter which side of the radiator it goes on as the water can flow both ways through the valve, however, if you want a proper and correct installation that works and does not let you down, TRV on the flow pipe, Lockshield valve on the return pipe.
Frost Protection
As well as all of our TRVs being provided with a lockshield valve, they also come with frost prevention mode. This is a very important function to a TRV, as it prevents your pipes and radiators in unused rooms from freezing, resulting in damage to your heating system and home. Frost prevention mode kicks in when you turn your TRV all the way off, if the temperature in the room drops below a certain level, the valve opens up a bit allowing a small amount of hot water from the boiler to come through and preventing the water in your system from freezing. Another way to look at this is, this mode is how you turn off radiators in unused rooms, to save money on your heating bill, without damaging your heating system and your home.
What do the settings on a TRV mean
The frost symbol – this indicates that the TRV is in frost protection mode. The other numbers on the TRV indicate the desired temperature that you want in the room before the TRV shuts off the flow of hot water to the radiator. 
This can be different on every TRV, and you should have received instructions with it to indicate what the temperature settings mean, but one very common misconception is “I’m cold, lets whack the TRV to 5 and get some heat”, that isn’t how this works and generally only causes them to work incorrectly. To understand how TRVs work, you need to think of your heating system as a whole
How is a system designed and installed
We mentioned earlier that at least one of your rooms has a manual valve and is called a reference room and is where your main boiler thermostat is located. We briefly covered the purpose of the Lockshield valve and how that is used to balance the radiators, making sure that they all heat up at the same time. The temperature of your home as a whole is set by the reference room boiler thermostat, usually between 18-21 degrees C. Looking at UK radiators TRV (image above), Setting 3 will be 20 degrees C, and setting 5 is 28 Degrees C, so let's see how this actually works in a given scenario. Scenario My main boiler thermostat is set to 20 degrees My TRV is currently set to 3 in a different room I walk into that room, feel chilly, and change the TRV to setting 5 But I don’t get any warmer, why? As we mentioned, each room is going to heat up at a relative rate, so in this instance, the main reference room will tell the boiler to turn off when the temperature of that room reaches 20 degrees. The TRVs job is to shut off the radiator when that room reaches, at setting 5 in our scenario above, 28 degrees. The number on the dial of a TRV does not increase the radiator temperature beyond the reference room as a general rule, but simply serves to prevent the room it is in from going over a certain temperature.
How do I use this information?
TRVs should be set lower than the main boiler thermostat or equal to it, generally speaking, setting this above that value won’t do anything. Your bedroom with a TRV however, could sit as low as 15.6 degrees as you use extra thermal protection (duvet etc.), so the TRVs job is to stop it going above a certain temperature, which is generally lower than your reference room temperature. Other than the TRV being broken, if your rooms are not heating up correctly and the TRV is set to a relative position to the reference room, the issue is going to be with balancing, the reference room valve setting or the radiator itself being too small for the operating boiler temperature. So as a rule of Thumb, TRVs have 2 positions that you use
- The frost prevention mode, when you don’t want the room to heat up
- 1 other number setting that prevents the room from getting too hot, this should not be higher than the reference room temperature.
There is no other reason to change the TRV setting, doing so will actually serve to just increase your heating bill without getting you the benefit that you actually want.
What is the Environmental Benefit to TRVs
Now you understand how TRVs work and when to use them, the Environmental Benefits of them come to light. So if you can install something to your heating system that effectively isolates the radiator when the desired room temperature has been reached, reducing the required amount of hot water needed to be heated to heat your home as a whole, allowing your boiler to shut off earlier, you reduce the amount of gas or electricity required for your wet system to operate efficiently for your home and comfort levels. Anything you can do to reduce the amount of gas or electricity will subsequently reduce your carbon footprint and be better for the environment, so TRVs are a great addition to a heating system.
What is the Cost Benefit to TRVs
While there may be an upfront cost to TRVs, as they help reduce the amount of Gas or Electricity required for your central heating system and given the way you are charged for energy depends on how much is used, you also reduce the cost of ongoing heating bills. Another way to look at this is, eventually your TRVs pay for themselves and provide a long-term cost saving compared to just having manual valves. It is one of the reasons why it is a common improvement listed on Energy Performance Certificates within homes.
Smart Tech adaptors (improved functionality, Environmental benefit and cost saving)
Wouldn’t it be great if you could get a device that turns your mechanical TRV into smart technology, not only giving you environmental and cost saving benefits, but learning your habits and needs, ensuring rooms are only heated when needed? Enter our choice for Smart Tech adaptors for any bog standard TRV on the market, the Radbot. This device is so easy to install and adds so much benefit, it is likened to adding energy efficient light bulbs to every room in your house. It comes complete with various parts to fit any common TRV on the market (it certainly fits on all our modern style TRVs), using motion sensors to detect people in the room, it will learn the times of day that you need the room to be warm and consequently, turn the valve on and off based on what it has learned about you. The temperature that you want the room at is still set by you though. There’s some serious energy saving potential there - so good in fact - the Radbot won the National Energy Efficiency Awards 2019 Product of the Year and is Endorsed by The Energy Saving Trust. It boasts an impressive potential reduction of up to 30% in your heating bills!
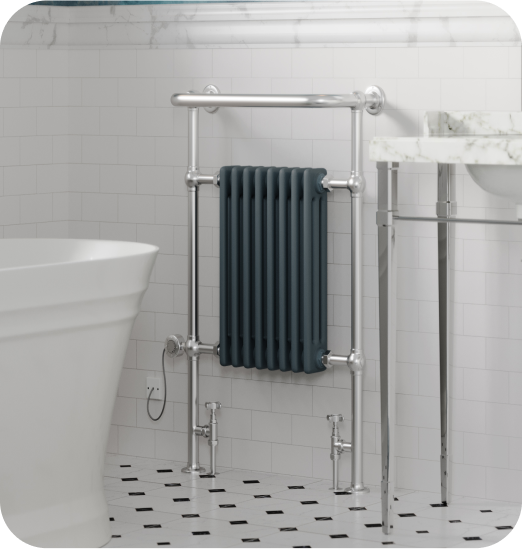
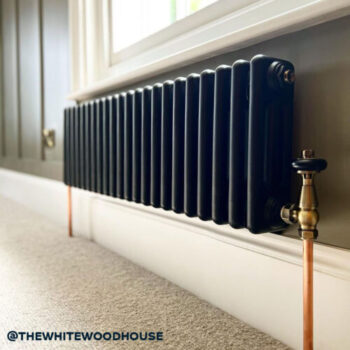
Style and Design
Valves are no longer defined solely by their functionality. In fact, some valves can make quite the statement and many modern day home renovators choose their valves to do just that! For those who have a period property of just love the vintage look, then we highly recommend out Signature Wooden Head, Signature Metal Head and Derry Traditional ranges for the perfect touch of vintage with a luxurious feel. These ranges are available in colours from shiny chrome and warm brass to the truly vintage natural pewter. Pair these traditional valves with our beautiful Alpha or Sherwood column radiators for the ultimate timeless look. Alternatively, work these with a designer radiator to help blend it into traditional style décor! Looking for something more modern? Well, there's even more to choose from! The Talus Bold and Derry Bold ranges boast a modern day design with colours which wont go un noticed! Match the white, anthracite or black options with one of our designer, column or bathroom radiators for a seamless finish. These valves are also available in the same warm brass and natural pewter as our traditional ranges for those of you who like a little contrast or want to match to the other fixtures, fittings and furniture in your home. If you fancy mixing some colours than our Talus Flair range offers the shiniest of chrome with a touch of either Anthracite, Black, White or Silver! From Terma we have a range of Integrated Dual Fuel valves which allow you have the flow and return on one side of the radiator, freeing up the other side for the element (sold seperately) to create a smooth dual fuel set up. The valve will thermostatically control the radiator when used with the central heating too! As you can see, there are a variety of radiators valves styles and designs on the market. Here at UK Radiators, we've tried to offer something for every home and radiator and you can see them all here.
How do TRVs connect to your radiator (what are Angled, Straight and Corner valves)
The shape and design of the valve is important to consider when purchasing as you need to connect the pipe to the radiator, and this changes depending on how the pipe runs and whether it is exposed or concealed.
Angled valves
These are most commonly used when the pipes come up from the floor and meet the radiator on the side. They are also used when the pipe comes out from the wall and bends up, and the radiator connector is on the side. However, sometimes you can use one of these where the pipes come out of the wall and the radiator connection is on the bottom, but the valve itself will protrude in front of the radiator, so where this is the case, we recommend corner radiator valves. All of our angled radiator valves come with matching shaped lockshield valves too in a range of styles, so you can keep your room’s aesthetic consistent, right down to the radiator fittings!

Corner radiator valves
Corner radiator valves are your go-to valve where the pipes come out of the wall as they can fit perfectly onto your rad (all of our offerings include Lockshield Valves). 
Straight radiator valves
Straight radiator valves (including Lockshield Valves) are the ideal valve for older homes built before the modern home building styles of today. You use straight radiator valves in the following scenarios:
- Where the pipes run from the floorboard up to the radiator, and the radiator connection is on the bottom.

- Where your pipes run along the skirting board, and connect to the side.

Where your pipes run down from the ceiling and bend round to meet the radiator on the side. 
- Where pipes come out of the wall, and bend round to meet the radiator on the side.
-
 Where pipes come out of the wall and bend up to meet the radiator on the bottom.

In simple terms, it is where you want a straight-line connector from pipes to radiator. Now we have covered everything we need to know about functionality, design and benefits of the TRV, let’s look at Maintenance
How to Isolate a TRV
As we mentioned earlier, TRVs by design always let a small amount of water through, this is due to the vital function of frost prevention mode, so when it comes to fully isolating a TRV it’s not as simple as just turning it off. When you purchase a TRV, it is usually provided with something called a decorator’s cap, this is a small cap that can be used to replace the TRV head. It is called as such, as it is commonly used to allow a decorator to remove a radiator from the wall, allowing them to decorate, without flooding the home (you can see our guide on how to remove a radiator for decorating here). To install the decorators cap, you first need to turn off the heating. To remove the TRV head, set the TRV to max and unscrewing the top anti clockwise (lefty loosy) at the part highlighted on the image below:
 You then screw on the decorator’s cap.
 This will prevent water from flowing through the valve and into the radiator. If you don’t have a decorator’s cap, the other alternative is installing an Isolator, this is also useful if the valve itself has a problem or when you need to replace the valve, as it attaches to the pipe before the valve and prevents water from reaching the TRV. The Aladdin easy fit isolator is a great tool for this, as it can be installed in a couple of minutes and is a DIY saviour when needing to stop a leak or allow you to replace parts of the heating system, including the radiator, yourself, without the worry of flooding your home. [embed]https://youtu.be/Cl0ZGqhI9ro[/embed] Now the other side of the radiator to the TRV should have a lockshield valve

The important bit here is when you turn this valve off, you need to count the number of turns, as this needs to be put back exactly how it was when you finish your work. Some valves you can just turn off, but sometimes you need to remove the head/cap of the valve and turn it off with a spanner. Clockwise (righty tighty) is off and often this is only a half turn.
How to fix a leaking TRV
The leak can come from a few places where your TRV can be the cause. Make sure the heating is off before attempting any fixes
Connection Union Nut


Sometimes you may need to replace the valve for this issue, but it can be possible to fix this or at least temporarily fix this issue quite easily without draining the whole system. To do so, you’ll need the following:
- Large Bucket
- Something flat and deep to catch water, like a paint tray, old oven dish or tupperware.
- PTFE Plumbers Tape
- Adjustable Spanner
- Some old Towels
- Bleed/Radiator Key (For Key Type)
- Screwdriver (for Screw Type)
Step 1 – Turn off valves Turn off your valves in the correct way. If you need a reminder, we covered each set up earlier in this post with how to isolate a TRV. Check the valves are off To check the valves are off, or off enough to do the job, open the bleed valve at the top of the radiator using a radiator bleed key or screwdriver as needed. Provided water doesn’t spray out then you are good to go. Make sure to close the bleed valve after. 
Step 2 – be prepared for water Lay down some towels, have the bucket ready. Use the flat deep object to catch water where you can under the valve. Step 3 – Slacken the Union Nut With the adjustable spanner, loosen the union nut on the below image.
.
You need to undo this enough to expose the olive. Note that water will start to come out of the radiator while you do this, so be prepared. Step 4 – Adding the PTFE Tape This bit is quite important, the tape needs to wrap in a certain direction, so it does not pull off when you screw the plug back in. Side Connection Sit behind the valve facing the radiator, you need to wrap the tape in an anti-clockwise direction around the olive. Wrap about 6 times if you can, pulling tight as you go Bottom Connection Look down at the valve from above, you need to wrap the tape in a clockwise direction around the olive. Wrap about 6 times if you can, pulling tight as you go. Step 5 – Tighten the union nut With the adjustable spanner, tighten the union nut on the valve highlighted on the below image. (Refer to image in step 3 for a reminder) Step 6 – Reset the lockshield and TRV valves Turn the lockshield valve back to its original position and turn the radiator manual/thermostatic valves on as well, back to the desired setting. Step 7 – Bleed the radiator Using the radiator bleed key or screwdriver, dependent on the valve type, and with a towel in hand, open the radiator bleed valve (lefty loosey) until water comes out and then tighten it again (righty tighty). Step 8 – Test the leak Dry the connection with a towel, wait a few minutes and then run a tissue over it. If the tissue is dry then you have successfully fixed the leak. If it is still wet, then either re-try the steps above, or it may be time for a new valve. This type of leak can also return, so if it is a persistent issue, it may also be time to replace the valve. Step 9 – Top up pressured systems If you lost a lot of water from the radiator with this one, then you may need to top up the heating system if it is a pressured system. Consult your boiler/heating system manual for how to do this. If you do need to top it up, then it is also a good opportunity to add an inhibitor to the system.
The TRV Head

Before you do this, you need to consult your warranty document for the valve, as you should only play about with the mechanisms of the valve if it is out of warranty. Sometimes you may need to replace the valve for this issue, which you can easily do with us at UK Radiators, but it can be possible to fix, or at least temporarily fix, this issue quite easily without draining the whole system. You’ll need the following:
- Large Bucket
- Something flat and deep to catch water, like a paint tray, old oven dish or tupperware.
- PTFE Plumbers Tape
- Adjustable Spanner
- Some old Towels
- Bleed/Radiator Key (For Key Type)
- Screwdriver (for Screw Type)
Step 1 – How to turn off valves the right way Now in this instance, turning the valves off can actually make the leak worse, as you know one valve is broken. So, by turning the other valve off, it may give the water only one option which is to escape through the broken valve. The recommended method is to get an isolator, which will also be handy to have if you have to replace the valve fully. Otherwise, turning the valves off in this instance depends on where the leak is. Step 2 – be prepared for water Lay down some towels, and have the bucket ready. Use the flat deep object to catch water where you can under the valve. Step 3 – Remove the valve head Remove the valve head, and note that for certain valves you may need to consult the user guide that came with it for instructions on how to do this. But, usually you just set the TRV to max and unscrew the valve head. 
Step 4 – tighten the hex Now this is important, as you need to tighten the hex a little bit, not fully tighten it. Just so there is a bit more tension. It still needs to be a bit loose in order to work.

Step 5 – Test the leak Dry the connection with a towel, wait a few minutes and then run a tissue over it. If the tissue is dry then you have successfully fixed the leak. If it is still wet, then either re-try the steps above, or it may be time for a new valve. There are some other ways to fix this type of leak, but we don’t recommend them as this involves taking apart the valve, which is against its natural design. So, if the leak hasn’t been fixed then it is better to replace it. This type of leak can also return, so if it is a persistent issue, it may also be time to replace the valve, which you can easily do by hopping over to our site.
Pipe connection Leak


WARNING: there is a right way to do this, and a quick way to do this. The quick way may result in the water from your system emptying onto your floor, so do it right! On a lot of forums and videos, when fixing a leak here you will be told “do it quick enough, and everything will be fine”. The problem with this is that if you are here, you are unlikely to be a plumber doing these types of things every day, and as meagre mortals the way we get quicker at something is repetition. So unless you have done this before, then the quick way is not recommended. The other common option is you will be told to drain the system. Again, this is quite a complex process for what is needed as you won’t know if the issue is resolved unless you refill the system, see the leak is present, then empty the system again to fix. There is however a 3rd option that adds heaps of benefits in the long term. We would recommend that you get an isolator for this radiator pipe, two would be future proofing but you only need one to fix our current pipe issue. You can see the isolators on this page, but this product does sell itself, which you can see on this video (note the handles are detachable once in place so you don’t have a big red lever spoiling your décor). Our recommendation is to try step one below, and if that does not work, then to purchase an isolator kit. You’ll need the following:
- Large Bucket
- Something flat and deep to catch water, like a paint tray, old oven dish or tupperware.
- PTFE Plumbers Tape
- Adjustable Spanner
- Some old Towels
- Bleed/Radiator Key (For Key Type)
- Screwdriver (for Screw Type)
- Isolator (See step 1 below)
Step 1 – Tighten the Union Nut Tighten the union nut that connects to the pipe, be careful when tightening not to cause further damage. If that resolves the issue, then great, if not then go onto step 2. 
Step 2 – Purchase and install an Isolator Our recommended isolators are the Aladdin EasyFit isolators. They fit 15mm pipes, but any isolator you can get that will suit your pipe size will work fine. These will be great to have if other issues occur or if the same issue comes back as you will already be prepared for it, and they are also handy for removing radiators for decorating. Install these and put them into the off position. Alternatively, if you don’t want to install isolators, be prepared to drain down your system. You will need to consult your boiler/heating system guide for how to do this. Step 3 – be prepared for water Lay down some towels, have the bucket ready. And use the flat deep object to catch water where you can under the valve. Remember, even with the isolators, water can still come out of the radiator. Step 4 – Slacken the Union Nut With the adjustable spanner, slacken/loosen the union nut on the valve highlighted on the below image. 
You need to undo this enough to expose the olive. Note: water will start to come out of the radiator while you do this, so be prepared. Step 5 – Adding the PTFE Tape This bit is quite important: the tape needs to wrap in a certain direction so it does not pull off when you screw the plug back in. Pipe from below Looking down at the valve from above, you need to wrap the tape in an anti-clockwise direction around the olive. Wrap about 6 times if you can, pulling tight as you go. Pipe from the side Sitting behind the valve facing the radiator, you need to wrap the tape in a clockwise direction around the olive. Wrap about 6 times if you can, pulling tight as you go. Step 6 – Tighten the union nut With the adjustable spanner, tighten the union nut on the valve highlighted on the below image. Step 7 – Test the leak Assuming you used the isolators as suggested, turn these back to the on position. Dry the connection with a towel, wait a few minutes and then run a tissue over it. If the tissue is dry then we have successfully fixed the leak. If it is still wet, then either re-try the steps above, or it may be time for a new valve. This type of leak can also return, so if it is a persistent issue, it may also be time to replace the valve.
Fixing a stuck valve head
When the valve head gets stuck, you will know this as the TRV setting is above 0/* the frost prevention mode, and hot water is not flowing into the radiator. This is a pretty easy one to fix without any water flowing out, but it is always best to be prepared for the worst, so make sure you have to hand
- An adjustable wrench
- Pliers
- WD40
- Large Bucket
- Something flat and deep to catch water, like a paint tray, old oven dish or tupperware.
- Some old Towels
Step 1 – Turn off the heating Pretty self-explanatory, but no need to burn yourself doing this Step 2 – Unscrew the TRV head Set the TRV to max, then unscrew the valve head

Step 3 – Apply some WD40 onto the Spindle Apply some WD40 to the spindle highlighted below, then tap the side of the valve with the wrench or use pliers to wiggle the spindle free.
. 
You should be able to put the spindle in and out with some ease. Step 4 – Re-attach the valve head Re-attach the valve head and test the heating radiator heats up when the heating is on and the TRV to your desired setting. If you still have issues, you can attempt these steps again, but it may be time to replace the valve.
Replacing/Installing a TRV
You will come across various methods online about installing TRVs without losing water, but be careful, as they often miss steps and the reality is that water will come out of the TRV when you remove it, how much water depends on the method you chose. The water is dirty and either reliant on gravity or there is pressure in the system, so can spray up your wall and damage your property and home decor if not done correctly. We have provided 3 methods in this blog, depending on your skill level and confidence with this task and plumbing jobs in general.
- Install Isolators - Beginner level and replacing 1 TRV, no skill required but does have the extra cost of isolators.
- Drain down the system - intermediate level or if you are replacing multiple TRVs, it will take time to drain down and refill the radiator system, but you won’t flood your home.
- Creating a vacuum - advanced level and replacing 1 TRV, while it will reduce the flow of water, you need to be able to change the TRV quickly before the vacuum breaks and water rushes out.
What do you need
- adjustable spanner
- grips
- PTFE (plumbers) tape
- Jointing compound
- old towels
- small tub to catch water
- Large bucket
- Decorators cap
- Radiator Bleed Key
Beginners guide to installing TRVs
You will probably be replacing both the TRV and the lockshield valve, using this method you have time to carry out the work and it is possible to do without losing any water or draining the radiator. We stock and recommend Aladdin easy fit isolators, they take a few minutes to install and are a great tool for jobs like this, with the added benefit of giving you a quick shut off if you create a leak when installing the new TRV. As you will probably be installing both the TRV and a matching lockshield valve, having 2 isolators may be a good idea. Install these and turn them to the off position, if you are not sure what this is, you will know when you loosen the other valves We then have 2 methods, one involving draining a radiator (if you are working by yourself) or another method where you can keep the water in the radiator, but you will need help with this. Draining the radiator method Step 1 - Turn off the heating Make sure the heating is turned off and the radiators and pipes are cool Step 2 - Turn off the lockshield valve Assuming you are installing a new Lockshield valve, you need to know what the current one is set to. Often you need to remove the head before you can turn this. Turn this off (clockwise) and count the number of turns, this may only be a quarter turn or half turn. Make a note of this. Step 3 - Lay down towels Lay down towels and place your small tub under the TRV side of the radiator Step 4 - Loosen the TRV connection Turn the TRV off using the number dial, this is usually to the number 0 or the frost symbol *. Unscrew the TRV to radiator connection highlighted in the image below until water starts flowing out. 

Step 5 - Drain the radiator Using the small container, catch the water flowing out from the radiator and move this to your large bucket until the radiator is empty. Finish unscrewing that nut. Step 6 - remove the old radiator connection This step is optional as whether or not the new and old radiator connections are compatible, but you should have been supplied with a new radiator connection so we will assume this needs changing The radiator connection is this part below: 
Step 7 - Remove the TRV Unscrew the bottom union nut on the TRV, if water rushes out, then turn your isolator off. 

Step 8 - wrap the PTFE tape on the new radiator connection tail You should wrap the PTFE tape in the opposite direction that we are screwing it in. Hold the part with the threaded wider section facing away, then wrap the tape in an anticlockwise direction.
 Tighten this into the radiator.
Step 9 - Put the union nuts and olives in place 
You add the nut first, with the wider section facing the valve, then the olive. Add the jointing compound around the olive to help this all seal together nicely. Step 10 - Put the TRV in place and tighten the union nut 

Step 11 - repeat steps 6-9 with the lockshield valve on the other side of the radiator. Step 12 - turn the valves on. You will need to open the TRV and the Lockshield valve, remember to turn the lockshield valve the same amount as when we closed it earlier in step 2. Step 13 - open the isolators Put the isolators into the on position, check that nothing is leaking. The good news is that if you have a leak, you can simply turn your isolators off again. If you have a leak, see the section on how to fix a leaking TRV above. Step 14 - refill the system If you are not sure what type of system you have, or you don’t know how to refill it and re-pressurise it, see our How to drain a radiator system guide, which will also cover bleeding the radiators. Method without Draining the radiator You will need two people for this method, one to hold the radiator and one to change the valve, if the radiator is too big and heavy when full, you will need to drain it per the steps above. Carry out steps 1-3 above Step A - Isolate the TRV Ideally you would use the decorators cap to do this, covered in the “How to Isolate a TRV” section of this guide. Your new valve should have one, so you can use this on the old valve for now. Step B - Unscrew the bottom union nuts only Do this on both sides of the radiator, if water comes out, make sure the isolators are in the off position


Step C - Remove the radiator from the wall Step D - Stand the radiator upright It is not a good idea to stand the radiator on the valve, so you will need to stand it upright on a ledge or table with the valve hanging over the edge 
Step E - replace the top valve Using steps 6-10 from the previous section as a guide, replace the top valve, when you put the new valve on, make sure it is fully off for a lockshield valve or for a TRV, put the decorators cap on. Obviously you cannot complete steps 6-10 fully as the radiator is off the wall and not near the bottom pipe. Step F - replace the second valve Turn the radiator over so that the valve you want to replace is pointing up. Using steps 6-10 from the previous section as a guide, replace the second valve. Step G - Put the radiator back on the wall Using steps 9 and 10 from the previous section as a guide, connect the radiator to the pipes. Step H - Complete the job Use steps 12-14 from the previous section to finish the installation, all being well in step 14, you may not need to refill the system, but you will need to bleed the radiator.
Intermediate guide to installing TRVs
Use this method if you are either comfortable with draining down the system or you have multiple TRVs to replace. Step A - Turn off the heating Make sure the heating is turned off and the radiators and pipes are cool Step B - Drain down the system If you don’t know how to drain down a system, or refill it, check out our How to drain a heating system guide. If you are replacing the TRV on a top floor radiator, you only have to ensure that the radiators on this level have drained out before starting your work. Step C - Replace the TRVs and Lockshield valves It is important to know the setting on the current Lockshield valve, you find this out by turning it off and counting the number of turns, this may only be a quarter or half turn. Make a note of this on each radiator you are replacing. You should still put down towels and have water pots to hand, as while the system should be empty, there may be some lingering water. If you are not sure how to replace a valve or need a refresher, see steps 6-11 in the beginners guide above. Step D - open valves and refill the system You will need your TRV to be open and the lockshield valve should be set as it was previously per the above step. You can then refill and re-pressurise the system. Step E - Fixing leaks If you find any leaks, see the section above for How to fix a leaking TRV.
Advanced guide to installing TRVs
If you are only changing one valve and you are comfortable with what this process is and all it entails, and if you can do it quick enough, it is possible to achieve this by creating a vacuum. WARNING: If this isn’t something you will do frequently and you do not replace valves on a regular basis, this is not recommended as while you will create a vacuum that slows the flow of water out of the pipes, if that vacuum breaks while you are working, you may very well flood the property or at the very least get black water all over white walls and beige carpets. If you are familiar enough with plumbing to work quickly, then the first time you attempt this should be on a ground floor radiator, somewhere that is easy to manage. You should only use this method if you are replacing a working valve, if it is a leaking valve, then you will not have time to wrap PTFE tape or apply jointing compound, you will also be using the existing union nuts and radiator tails, so if there is a design or style consideration i.e. the nuts and tail are a different colour or size, this method is not recommended. How you create the vacuum depends on the type of heating system in place. We do want to take a brief moment to point out that a lot of the information you find online for this method literally uses a vacuum cleaner, while you can use a wet vacuum to syphon water away, this is not the vacuum you are looking for. Think of this like a straw and a soft drink, put the straw in, put your thumb over the top, take the straw out. The liquid stays in the straw as a vacuum has been created. Step 1 - Turn off the heating Make sure the heating is turned off and the radiators and pipes are cool Step 2 - Prep the new TRV You will be using the existing radiator tail, union nuts and olives, so make sure these are compatible with the new valve before going any further. Remove the union nuts and olives from the new valve, you want the valve to be bare, it is sometimes easier to handle if you remove the TRV head as well. Put the decorators cap on the new TRV. Step 3 a - Creating a vacuum on a feed and Expansion (F&E) or Gravity fed system You will need to find any air admittance valves on the system and close these. Find the outlet on the expansion tank that is below the surface of the water, if you can find a valve to shut this off, then use that, otherwise you will need to bung it. 
You will also need to seal off the expansion pipe by using a bung 

Step 3 b - Creating a vacuum on a pressure system To start, you need to release the pressure from the system and get the pressure bar down to 0. You can do this with the high pressure release valve, or by using a drain off. Step 4 - Turn off all valves It can be a good idea to turn off all lockshield and TRVs around the property, remember the lockshield settings because you want to put this back to how it was when you have finished. Step 5 - Test the vacuum On the radiator where you want to replace the valve, put down some old towels With a small tub in hand, open the bleed valve. Catch the water until it stops coming out. With the bucket in hand, remove the bleed valve entirely, if the flow of water has stopped or slowed to a trickle, then you should be good to go. Replace the bleed valve. Step 6 - Replace the valves You won’t have time for PTFE or jointing compound and you will want to use the existing olives and union nuts, as well as the existing radiator tail. If at any point when removing the old valve the water shoots out, re-tighten it as the vacuum has failed and you will need to repeat Step 3 above. Step 7 - Put the system back to how it was Open the valves back up on all radiators Take out any bungs from the expansion tank if you used them. Re-pressurise the system if it is a pressurised system. We hope you have found everything you need in this ultimate guide, but of course if you have a more specific question or need any help at all, then please contact us and one of the team will be happy to help.